

There’s something truly magical about this festive treat that makes chilly December days cozier—the creamy, velvety texture and the cheerful red and green swirls make this Christmas Swirl White Chocolate Fudge Recipe a standout at any holiday gathering. I love how it blends smooth sweetness with a pop of holiday color, making both the taste and the presentation absolutely irresistible.

Why You’ll Love This Recipe
- Festively Fun Swirls: Those vibrant red and green swirls make every slice a cheerful delight that brightens up your dessert table.
- Simple Ingredients, Big Flavor: Using white chocolate chips, butter, and condensed milk creates an ultra-creamy fudge that’s easier than traditional recipes.
- Perfect Holiday Gift: Cut into bite-sized pieces and wrapped up, it’s a sweet homemade gift anyone would treasure.
- Great Make-Ahead Option: It holds up well stored in the fridge or freezer, so you can prepare it ahead of time without stress.

Ingredients You’ll Need
Each ingredient plays a crucial role in achieving that creamy texture and vibrant color, so it’s worth picking quality products and having your tools ready.

- White chocolate chips: I always use premium brands like Ghirardelli for the best melt and rich flavor without artificial aftertastes.
- Sweetened condensed milk: This adds sweetness and creaminess while keeping the fudge wonderfully dense and smooth.
- Unsalted butter: Cold and cubed butter helps balance the sweetness and adds that melt-in-your-mouth richness.
- Red gel food coloring: Gel colors give vibrant hues without altering the fudge consistency; start with a little and build up.
- Green gel food coloring: Like red, this enables you to create perfect festive swirls with just a few drops.
Variations
Sometimes I like to put my personal twist on this Christmas Swirl White Chocolate Fudge Recipe to adjust for diet preferences or even change the festive color mix—feel free to make it your own!
- Mint Variation: Adding a touch of peppermint extract to the white chocolate base turns it into a refreshing holiday treat that my family adores.
- Dairy-Free Version: Subbing in coconut milk condensed milk and dairy-free white chocolate chips worked well when a friend needed a vegan option.
- Alternative Swirls: Try using berry or cranberry gel colors for a slightly different look that still feels festive and bright.
- Mini Fudge Bites: Pour into mini silicone molds for cute single-serving bites that make party snacking a breeze.
How to Make Christmas Swirl White Chocolate Fudge Recipe
Step 1: Prepare Your Pan Like a Pro
I line an 8×8-inch straight-sided baking pan with parchment paper, making sure to leave enough overhang on the sides. This trick helps you lift the whole block of fudge cleanly out when it’s set, saving you from a sticky chopping mess later on.
Step 2: Melt the Magic
In a medium saucepan over medium-low heat, stir together white chocolate chips, sweetened condensed milk, and cold butter cubes continuously. This takes about 4 to 6 minutes — patience here is key! Watch closely so the chocolate melts smoothly without scorching; stirring constantly prevents graininess and keeps that silky texture.
Step 3: Color Your Fudge Portions
Once melted, remove from heat and divide the mixture into three parts. Add red gel food coloring to one third and green gel food coloring to another third, stirring each until color is evenly mixed with no streaks. The last third remains white to balance the festive swirl.
Step 4: Create Those Gorgeous Swirls
Drop spoonfuls of the white, red, and green fudge mixtures randomly into the pan. Taking a wooden skewer or butter knife, gently swirl the colors for a beautiful marbled effect—don’t over-swirl, or the colors will blend and lose that wow factor. I’ve learned that a light touch here makes all the difference.
Step 5: Smooth and Chill
Place a small piece of parchment over the top and lightly press down to smooth out the surface while keeping that festive pattern intact. Then pop it in the fridge for 2 to 3 hours until firm. Patience really pays off when you see how nicely it sets!
Step 6: Slice and Share
Using the parchment overhang, lift the fudge out of the pan onto a cutting board. I like to warm my knife under hot water and wipe it dry before cutting—it glides through the fudge so much easier. Cut into 1-inch squares and watch everyone’s eyes light up at the holiday spectacle.
Pro Tips for Making Christmas Swirl White Chocolate Fudge Recipe
- Use Quality Chocolate: I tried cheaper brands once, but premium white chocolate makes a noticeable difference in smoothness and flavor.
- Work Quickly with Coloring: Once the fudge cools, it thickens fast; if you wait too long, it’ll be hard to mix in the gel colors evenly.
- Avoid Overheating: Stir constantly during melting, and don’t rush it, or the chocolate can seize, ruining the texture.
- Warm Your Knife for Clean Cuts: Running your knife under warm water (and drying it) helps you get smooth slices without squishing the fudge.
How to Serve Christmas Swirl White Chocolate Fudge Recipe
Garnishes
I love sprinkling some crushed peppermint candies or edible glitter on top before chilling for an extra festive touch. A few tiny fresh rosemary sprigs can also add a subtle pine aroma that pairs beautifully with the sweetness.
Side Dishes
This fudge goes perfectly alongside warm spiced cider or a bold cup of coffee to balance its sweetness. At holiday parties, I pair it with a cheese board featuring mild cheeses and nuts so guests have a full flavor experience.
Creative Ways to Present
For gifting, I wrap batches in festive wax paper tied with twine and add personalized gift tags—a simple setup that looks professional and heartfelt. Serving on a wooden board with fresh evergreen sprigs makes it an eye-catching centerpiece.
Make Ahead and Storage
Storing Leftovers
I store leftover fudge in an airtight container in the refrigerator, where it keeps beautifully for up to one week. Lining the container with parchment paper between layers prevents sticking and preserves the swirls.
Freezing
I’ve frozen this fudge wrapped tightly in plastic wrap and placed inside a freezer bag for up to two months without losing texture or flavor. When ready to enjoy, I thaw it overnight in the fridge to keep it from getting too soft.
Reheating
I don’t really reheat fudge since it’s best served chilled, but if it feels too firm straight from the fridge, letting it sit at room temperature for about 20 minutes softens it up just right for eating.
FAQs
-
Can I use regular liquid food coloring instead of gel?
Gel food coloring is best because it adds vivid color without changing the fudge’s consistency. Liquid food coloring can make the fudge runnier and may affect how it sets, so I recommend sticking to gels for this recipe.
-
How do I prevent my white chocolate from burning?
Use low to medium-low heat and stir constantly while melting the white chocolate, butter, and condensed milk. This even heat distribution stops hotspots that can burn the chocolate and create a grainy texture.
-
Why is my fudge grainy after chilling?
Most often, graininess happens when the chocolate overheats or isn’t stirred constantly during melting, causing sugar crystals to separate. Keep the heat gentle and stir regularly and you’ll get a silky finish every time.
-
Can I skip the swirls and just make plain white chocolate fudge?
Absolutely! You can just melt the ingredients together and pour straight into your pan for a classic white chocolate fudge. The swirls are a fun festive addition but totally optional.
-
What’s the best pan size to use?
An 8×8-inch straight-sided square pan works best, giving you fudge that’s thick enough to cut into satisfying bite-sized pieces. Make sure to line it with parchment for easy removal!
Final Thoughts
This Christmas Swirl White Chocolate Fudge Recipe has become a holiday staple in my kitchen because it’s not only visually stunning but also incredibly easy to make. I love the way it brings instant cheer, whether it’s for a cozy night in or a festive party. Give it a try—you’ll find the process really enjoyable, and the results are always a hit with friends and family. Trust me, once you taste this fudge, it’ll be on your Christmas recipe rotation forever.
Print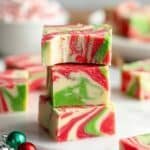
Christmas Swirl White Chocolate Fudge Recipe
- Prep Time: 15 minutes
- Cook Time: 6 minutes
- Total Time: 3 hours 15 minutes
- Yield: 64 pieces 1x
- Category: Dessert
- Method: Stovetop
- Cuisine: American
- Diet: Vegetarian
Description
This festive Christmas fudge features a rich and creamy white chocolate base swirled with vibrant red and green gel food coloring for a colorful holiday treat. Easy to prepare and perfect for gifting or sharing, this fudge combines sweetened condensed milk, butter, and white chocolate chips to create a smooth and luscious confection.
Ingredients
Main Ingredients
- 22 oz white chocolate chips (2 11-oz. bags, Ghirardelli brand recommended)
- 14 ounce can sweetened condensed milk
- 4 tablespoons unsalted butter, cold and cut into small cubes
Coloring
- ¼–½ teaspoon red gel food coloring (Americolor brand recommended)
- ¼–½ teaspoon green gel food coloring (Americolor brand recommended)
Instructions
- Prepare Pan: Line an 8×8 inch straight sided baking pan with parchment paper making sure there is enough overhang on the sides. This will allow you to easily lift the fudge out for cutting after it has set.
- Melt Ingredients: In a medium saucepan over medium-low heat, add the white chocolate chips, sweetened condensed milk, and cold cubed butter. Stir constantly for 6 minutes or until all chips are fully melted and the mixture is smooth. Remove from heat.
- Divide and Color: Transfer one third of the melted chocolate mixture into a small bowl and stir in the red gel food coloring starting with ¼ teaspoon. Mix until color is uniform with no white streaks. Repeat with another third of the mixture using green gel food coloring.
- Assemble Fudge: Add dollops of the white, red, and green fudge mixtures randomly into the prepared baking pan until all mixtures are used.
- Swirl Pattern: Using a wooden skewer or butter knife, gently swirl the different colored fudge dollops to create a decorative swirl pattern on top.
- Smooth Top: Press a small piece of parchment paper lightly over the top of the fudge while it is still soft to smooth the surface. Be careful not to disturb the swirl pattern.
- Chill: Place the fudge in the refrigerator for 3 hours to allow it to fully set and harden.
- Cut and Serve: Once set, lift the fudge out using the parchment paper overhang and place on a cutting board. Cut into 64 pieces, each approximately 1×1 inch, and serve.
Notes
- Store fudge in an airtight container in the refrigerator for up to 1 week.
- For longer storage, freeze fudge up to 2 months in an airtight container. Thaw in the refrigerator before serving.
- Line the pan with parchment paper sprayed with cooking spray or lightly rubbed with butter to prevent sticking.
- Work quickly when mixing gel food coloring into the melted mixture as it will firm up rapidly.
- If fudge mixture firms too much, warm the bowls briefly for 15-20 seconds to soften before finishing assembly.
- Avoid overheating or burning the chocolate by stirring constantly and removing from heat as soon as smooth.
- Use a warm knife (run under warm water and dried) to easily cut the fudge without crumbling.
- This fudge is very rich; serve in small portions.


