

There’s something undeniably festive and fun about this **Christmas Lasagna Dessert Recipe**—layers of creamy cheesecake, minty pudding, and a vibrant red crust come together like a holiday dream. Trust me, it’s not just pretty to look at; it’s a crowd-pleaser that brings cozy Christmas vibes to your table.

Why You’ll Love This Recipe
- Festive Layers: Each colorful layer adds a new texture and flavor, making every bite feel like a holiday celebration.
- No-Bake & Easy: It’s straightforward to prepare, no baking required—perfect for busy holiday cooks.
- Make-Ahead Friendly: Chill it overnight or freeze it ahead to save stress on party day.
- Everyone Loves It: From kids to adults, this dessert always gets rave reviews at my family gatherings.

Ingredients You’ll Need
This Christmas Lasagna Dessert Recipe blends everyday ingredients with festive pops of color and peppermint flavor. Keep an eye out for quality cream cheese and a good whipped topping for the creamiest results.

- Vanilla Wafers: These form a sturdy, sweet crust that crisps up nicely after mixing with butter.
- Salted Butter: Adds richness to the crust and helps the red color meld evenly.
- Red Food Coloring Gel: I prefer gel for deep, vivid color without messing with texture.
- Cream Cheese: Softened properly, it gives the cheesecake layer a smooth, tangy base.
- Granulated Sugar: Sweetens the cheesecake filling just right.
- Sour Cream: Adds a lovely creaminess and balances sweetness beautifully.
- Whipped Topping: Make sure it’s thawed and fluffy for folding into cheesecake and topping the dessert.
- Heavy Cream: The secret to making the peppermint pudding rich and thick.
- Peppermint Extract: Just a little goes a long way to give that refreshing holiday taste.
- Green Liquid Food Coloring: For that perfect, cheerful green pudding layer.
- Cheesecake Instant Pudding Mix: Creates the smooth, set pudding layer that contrasts with the cheesecake.
- Mini Marshmallows & Christmas Candies: Optional, but they add the perfect festive touch on top.
Variations
I’ve played around with this Christmas Lasagna Dessert Recipe quite a bit and love that you can tweak it to suit your tastes or dietary needs. Don’t hesitate to make it your own!
- Berry Twist: Swapping peppermint extract with raspberry or strawberry flavor gives a fruity holiday spin that my family adores.
- Dairy-Free Version: Use dairy-free cream cheese and whipped topping alternatives; just be mindful the texture might be slightly different but still delicious.
- Alcohol-Infused: Adding a splash of peppermint schnapps or crème de menthe in the pudding layer turns this into a grown-up treat I sometimes make for Christmas Eve.
How to Make Christmas Lasagna Dessert Recipe
Step 1: Craft the Festive Red Crust
Start by crushing vanilla wafers in a food processor until fine crumbs form; this can take 1-2 minutes depending on your machine. Next, mix melted butter with a scoop of red gel food coloring until it looks like a vibrant Christmas red—this is key to that festive pop. Combine the colored butter with the crumbs and pulse briefly until everything is evenly tinted. Press the mixture firmly into the bottom of a 9×13 glass dish, then pop it in the freezer to chill while you prepare the other layers. I like to press hard here; it makes it easier to slice later without crumbling.
Step 2: Whip Up the Creamy Cheesecake Layer
Using a hand or stand mixer, beat softened cream cheese and sugar until light and fluffy, about 1-3 minutes—patience here really pays off. Blend in sour cream for smoothness, then gently fold in the whipped topping to keep things airy. Be sure to scrape down the bowl sides to incorporate all the ingredients evenly. Spread this mixture onto your chilled red crust, smoothing carefully to keep the edges clean—you want a sharp layered look. Toss it back in the freezer while you make the pudding.
Step 3: Prepare the Minty Green Peppermint Pudding
Whisk heavy cream with green liquid food coloring and peppermint extract in a large bowl until well combined. Add your cheesecake instant pudding powder and beat with a mixer until the pudding thickens and is lump-free; this usually takes 1-2 minutes. Pour this luscious green layer over the cheesecake, smooth it out evenly, and clean the sides of the pan to keep everything neat. Return the pan to the freezer for 5-10 minutes to let it set up nicely.
Step 4: Finish with Whipped Topping and Chill
Spread the last tub of whipped topping over the pudding layer, leveling to ensure it’s even. Cover the whole dessert and chill in the freezer for at least 30 minutes, or refrigerate it for 3 hours or overnight if you prefer a softer set. When you’re ready to serve, top with mini marshmallows and sprinkle fun Christmas candies or red & green M&Ms all over. It’s that easy to create a showstopper dessert!
Pro Tips for Making Christmas Lasagna Dessert Recipe
- Use Gel vs. Liquid Coloring: I learned the hard way that gel food coloring makes the crust layer vibrant without sogginess, while liquid food coloring works best in the pudding for smooth blending.
- Mixers Are Your Friend: Hand or stand mixers help avoid lumps in both cheesecake and pudding layers; trust me, it’s worth the convenience.
- Clean Pan Edges Each Layer: Wiping down the sides after each layer makes your lasagna look clean and professional—presentation counts!
- Patience Is Key: Letting the layers chill properly before adding the next helps the final dessert hold its shape when sliced.
How to Serve Christmas Lasagna Dessert Recipe

Garnishes
I usually stick with mini marshmallows and bright red and green M&Ms on top—these add a playful texture and festive colors that get everyone excited. Sometimes I toss on some crushed peppermint candy canes for extra crunch and peppermint punch. These little details really brighten up the table.
Side Dishes
This dessert is rich and refreshing, so I love pairing it with something light like a citrus salad or a simple plate of fresh fruit. It balances out the indulgence and keeps the meal feeling festive yet fresh.
Creative Ways to Present
For holidays, I’ve served this in glass trifle bowls to show off the layers, which always wows guests. You can also cut individual portions into festive clear cups or mason jars—perfect for gift-giving or potlucks. Adding a sprig of fresh mint or a small candy cane alongside really amps up the presentation.
Make Ahead and Storage
Storing Leftovers
Leftover Christmas lasagna keeps beautifully in the fridge, covered tightly with plastic wrap or a lid, for up to 3-5 days. I find it tastes even better the next day once all the flavors have melded together.
Freezing
I’ve frozen this dessert wrapped securely in plastic wrap and foil for up to 3 months without losing its creamy texture. Just be sure to thaw it slowly in the fridge overnight before serving to keep the layers intact.
Reheating
This dessert is best served chilled, so reheating isn’t really necessary. Simply let any thawed leftovers come to fridge temperature, then serve cold for that perfect creamy consistency.
FAQs
-
Can I make the Christmas Lasagna Dessert Recipe without a food processor?
Absolutely! If you don’t have a food processor, you can place the vanilla wafers in a large zip-top bag and crush them with a rolling pin until fine crumbs form. Just make sure they’re crushed evenly for the best crust texture.
-
What’s the best way to soften cream cheese quickly?
I like to cut the cream cheese into small cubes and let it sit at room temperature for about 30 minutes. If you’re in a hurry, microwave it on low power in 10-second intervals, checking and turning between rounds to avoid melting.
-
Can I substitute the peppermint extract in the pudding layer?
You sure can! I’ve swapped it with vanilla or almond extract for a different but still delicious flavor. Just adjust the amount to taste since some extracts are stronger than others.
-
How do I get clean layers and avoid mixing the fillings?
Patience is important here: make sure each layer is chilled or set before adding the next, and use a gentle hand when spreading. Also, wiping the sides of the dish between layers keeps your layers distinct and the final presentation beautiful.
-
Is it okay to use store-bought whipped topping?
Yes, store-bought whipped topping works perfectly here and saves time. Just thaw it fully and fold in gently for that fluffy texture without deflating it.
Final Thoughts
This Christmas Lasagna Dessert Recipe has become a holiday staple in my home because it’s both stunning and oh-so-delicious. I love how surprisingly easy it is to pull together and how much joy it brings around the dessert table. If you want a festive treat that’s guaranteed to impress with minimal fuss, this is your go-to. Give it a try—you might just start a new tradition!
Print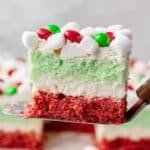
Christmas Lasagna Dessert Recipe
- Prep Time: 30 minutes
- Cook Time: 0 minutes
- Total Time: 1 hour
- Yield: 15 servings 1x
- Category: Dessert
- Method: No-Cook
- Cuisine: American
- Diet: Vegetarian
Description
A festive no-bake Christmas Lasagna dessert featuring a vibrant red vanilla wafer crust, creamy white cheesecake layer, peppermint-flavored green pudding, and a whipped topping adorned with mini marshmallows and holiday candies. Perfect for holiday celebrations and easy to prepare ahead of time.
Ingredients
Red Crust
- 22 ounces vanilla wafers (2 11-ounce boxes)
- 1 cup (2 sticks) salted butter, melted
- Red food coloring gel, small scoop
White Cheesecake
- 8 ounces cream cheese, softened
- ⅓ cup granulated white sugar
- ½ cup sour cream
- 2 cups whipped topping
Green Peppermint Pudding
- 4 cups heavy cream
- ½ teaspoon peppermint extract
- 6.8 ounces cheesecake instant pudding mix (two 3.4-ounce boxes)
- Green liquid food coloring, to desired shade
Topping
- 8 ounces whipped topping tub
- 3 cups mini marshmallows
- Christmas candies, sprinkles, or red & green M&Ms for garnish (optional)
Instructions
- Crush Vanilla Wafers: Place the vanilla wafers into a food processor and crush on high for 2 minutes until they become fine crumbs.
- Prepare Red Crust: In a small bowl, combine melted butter with a small scoop of red food coloring gel until you achieve a deep Christmas red color. Pour this mixture into the crushed wafers and pulse until evenly colored.
- Form Crust: Press the colored crust firmly into the bottom of a deep 9×13 inch glass baking dish. Place the crust in the freezer while preparing the next layer.
- Make Cheesecake Layer: In a large mixing bowl, beat the softened cream cheese and granulated sugar with a hand or stand mixer for 3 minutes until light and fluffy. Add in the sour cream and beat for 2 more minutes until smooth.
- Fold in Whipped Topping: Gently fold the 2 cups of whipped topping into the cream cheese mixture until fully combined, scraping down the bowl as necessary.
- Spread Cheesecake Layer: Evenly spread the cheesecake mixture over the frozen crust. Wipe any excess from the sides of the pan and return to the freezer.
- Prepare Peppermint Pudding: In a large bowl, whisk together heavy cream, green liquid food coloring, and peppermint extract. Sprinkle in both packets of cheesecake instant pudding mix and beat with a mixer until smooth and thick, about 2 minutes.
- Spread Pudding Layer: Pour the green pudding evenly over the cheesecake layer. Clean the sides of the pan and return the dish to the freezer for 10 minutes until the pudding firms up.
- Add Final Whipped Topping: Spread the remaining 8 ounces whipped topping evenly over the pudding layer. Cover the dessert and return to the freezer for 30 minutes to 1 hour, or refrigerate for at least 3 hours or overnight to chill thoroughly.
- Garnish and Serve: Before serving, remove the cover and sprinkle mini marshmallows evenly on top. Add Christmas candies, sprinkles, or red and green M&Ms if desired. Serve chilled.
Notes
- Use gel food coloring for the crust layer and liquid food coloring for the pudding for best results.
- A hand or stand mixer is recommended when making the pudding and cheesecake layers to avoid lumps and achieve a smooth texture.
- Clean the sides of the pan after each layer to maintain clean, distinct layers for a beautiful presentation.
- The longer the dessert chills, the more intense the peppermint flavor and colors become; plan chilling time accordingly.
- Store covered in the refrigerator for 3-5 days or freeze wrapped well for up to 3 months.


