

Crunchy, chocolaty, and irresistibly peanut buttery — that’s what you get with this No Bake Butterfinger Cornflake Bars Recipe. It’s a breeze to make and always a hit at gatherings, especially when you don’t want to heat up the kitchen. I love how the cornflakes stay nice and crispy, and the chocolate topping gives it that perfect finishing touch.

Why You’ll Love This Recipe
- No-Bake Convenience: You don’t need an oven, so it’s perfect for quick prep or warm days.
- Crunchy, Sweet, and Peanutty: The combo of cornflakes, peanut butter, and chocolate gives a satisfying texture and flavor.
- Kid-Friendly and Fun: My family loves making these together—it’s a fun activity and a guaranteed treat.
- Customizable: You can tweak the chocolate or nut butter to suit your taste or dietary needs.
Ingredients You’ll Need
These ingredients work hand-in-hand to deliver that buttery, crunchy goodness you crave. When you shop, grab the creamiest peanut butter you can find—it really makes a difference in the texture and flavor of your bars.

- Light Corn Syrup: Adds sweetness and binds the bars without overpowering the other flavors.
- Granulated Sugar: Sweetens and combines with corn syrup to create that sticky coating.
- Creamy Peanut Butter: Use a smooth version for the best texture and spreadability.
- Cornflakes Cereal: Gives the bars their signature crunch and lightness.
- Semi-Sweet Chocolate Chips: Melts smoothly for the silky chocolate topping.
- Additional Creamy Peanut Butter (for topping): Mixed with chocolate to add richness and a smooth finish.
Variations
What I love most is how versatile this No Bake Butterfinger Cornflake Bars Recipe is. Feel free to play around and make it your own—it’s an easy base for adding extras or switching ingredients to suit your cravings.
- Dark Chocolate Topping: I swapped the semi-sweet chips for dark chocolate once; it added a wonderful depth that balanced the sweetness beautifully.
- Add Nuts or Seeds: Toss in some chopped almonds or sunflower seeds for extra crunch and nutrition—my kids love the surprise bits.
- Peanut-Free Version: Substitute peanut butter with sunflower seed or almond butter for allergies—I’ve done this for a friend and it turned out great.
- Mini Butterfinger Chunks: Try chopping up actual Butterfinger bars and sprinkling them into the mix for an authentic touch.
How to Make No Bake Butterfinger Cornflake Bars Recipe

Step 1: Prepare Your Pan
Start by lining a 9×13-inch baking dish with parchment paper, leaving the edges hanging over the sides. This little trick helps you lift the bars out cleanly when they’re set, without any mess or crumbly edges.
Step 2: Cook the Sugar Mixture
Combine 1 cup of light corn syrup and 1 cup granulated sugar in a large saucepan. Cook it over medium heat, stirring constantly, just until the sugar dissolves and the mixture starts to bubble gently. This is key—you want to melt the sugar fully without burning it.
Step 3: Stir in Peanut Butter
Remove the pan from heat right away and add 1¼ cups creamy peanut butter. Stir it briskly until the mixture’s smooth and glossy. This step blends the flavors and gives your bars that rich, buttery feel.
Step 4: Mix the Cornflakes
Pour 8 cups of cornflakes into a large mixing bowl, then gently fold in the peanut butter mixture. Be careful here—mix just enough to coat the flakes so they stay nice and crunchy without turning to mush.
Step 5: Press Into Pan
Transfer the coated cornflakes to your prepared pan. Use a spatula or lightly greased hands to press the mixture firmly and evenly—this helps the bars hold together once cooled.
Step 6: Prepare the Chocolate Topping
In a microwave-safe bowl, combine 1½ cups semi-sweet chocolate chips with ¼ cup creamy peanut butter. Heat in 20-second bursts, stirring between each, until the mixture is fully melted and smooth. This topping is what really kicks these bars up a notch.
Step 7: Spread and Chill
Spread the melted chocolate evenly over the cornflake base. Pop the entire dish in the fridge for at least an hour so the bars can set completely. I sometimes let them chill overnight for easier slicing.
Step 8: Slice and Serve
Using the parchment overhang, lift the bars out of the pan and onto a cutting board. Slice into squares or rectangles and serve. These bars hold up great and are nice and portable—perfect for sharing.
Pro Tips for Making No Bake Butterfinger Cornflake Bars Recipe
- Mix Gently: Overmixing will crush the cornflakes and make the bars dense instead of crunchy—fold carefully.
- Use Parchment Paper with Overhang: This saved me so many headaches when lifting the bars out without breaking.
- Microwave in Short Bursts: Heating chocolate too long can seize it—20-second intervals with stirring kept mine silky.
- Press Firmly: Applying enough pressure when pressing the base will help your bars stick together perfectly, avoiding crumbly edges.
How to Serve No Bake Butterfinger Cornflake Bars Recipe

Garnishes
I often sprinkle a tiny pinch of flaky sea salt on top of the chocolate before chilling—it cuts through the sweetness and adds a nice contrast. Sometimes I drizzle a little white chocolate for a pretty swirl that wows my guests.
Side Dishes
These bars pair wonderfully with a cold glass of milk or a cup of coffee for a mid-afternoon pick-me-up. For parties, I like serving them alongside fresh fruit to balance the richness.
Creative Ways to Present
For birthdays or holidays, I’ve arranged the bars in a checkerboard pattern on a platter with mini marshmallows and candy sprinkles around the edges. They also make great little gift packages wrapped in cellophane tied with a ribbon—everyone loves receiving these!
Make Ahead and Storage
Storing Leftovers
I store leftover bars covered tightly in an airtight container in the fridge. They stay fresh and crunchy for about a week, though they rarely last that long at my house!
Freezing
To freeze, I wrap individual bars in plastic wrap and place them in a freezer-safe bag. When thawed in the fridge overnight, they retain their texture and taste almost as good as fresh.
Reheating
Since these bars are best enjoyed cool and firm, I usually eat them straight from the fridge or let them sit at room temperature for 10–15 minutes. Avoid microwaving or reheating—you’ll lose the crunch and the chocolate could melt unevenly.
FAQs
-
Can I use crunchy peanut butter instead of creamy?
Yes, you can! Using crunchy peanut butter will add extra texture and little nutty bits throughout the bars. Just keep in mind it might make the mixture a bit thicker and harder to coat the cornflakes evenly.
-
What if I don’t have corn syrup?
A common swap is honey or maple syrup, but these can change the flavor and texture slightly. Light corn syrup helps with that classic sticky binding without adding much flavor. If substituting, reduce any added sweeteners accordingly.
-
How can I make these gluten-free?
Just make sure the cornflakes you choose are certified gluten-free, as some brands may contain wheat or barley malt. The rest of the ingredients are naturally gluten-free.
-
Why are my bars sticky even after chilling?
Sometimes not cooking the sugar mixture long enough or not chilling the bars long enough causes stickiness. Make sure the sugar fully dissolves in the syrup and give the bars at least an hour in the fridge to set firmly before slicing.
Final Thoughts
I absolutely love how this No Bake Butterfinger Cornflake Bars Recipe turns out every time—it’s a nostalgic, crowd-pleasing treat that’s easy enough for anyone to make. Whether you’re baking with kids or need a quick, no-fuss dessert, these bars have become a staple in my kitchen. Give it a try, and I’m confident you’ll find it as delightful and fuss-free as I do!
Print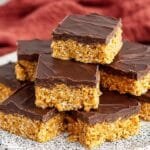
No Bake Butterfinger Cornflake Bars Recipe
- Prep Time: 20 minutes
- Cook Time: 5 minutes
- Total Time: 1 hour 20 minutes
- Yield: 16 servings 1x
- Category: Dessert
- Method: No-Cook
- Cuisine: American
Description
These No Bake Butterfinger Bars combine crunchy cornflakes with a sweet and creamy peanut butter base, topped with a smooth chocolate layer for a quick and delicious treat without needing to bake.
Ingredients
Base
- 1 cup light corn syrup
- 1 cup granulated sugar
- 1 1/4 cups creamy peanut butter
- 8 cups cornflakes cereal
Chocolate Topping
- 1 1/2 cups semi-sweet chocolate chips
- 1/4 cup creamy peanut butter
Instructions
- Prepare Pan: Line a 9×13-inch baking dish with parchment paper, leaving overhang on the sides to help lift the bars easily once set.
- Cook Syrup Mixture: In a large saucepan over medium heat, combine 1 cup light corn syrup and 1 cup granulated sugar. Stir continuously until the sugar dissolves and the mixture starts to bubble gently.
- Add Peanut Butter: Remove the saucepan from heat and immediately stir in 1 1/4 cups creamy peanut butter until the mixture is smooth and well combined.
- Combine with Cereal: Place 8 cups cornflakes in a large bowl. Pour the peanut butter mixture over the cereal and gently fold to coat the flakes evenly, taking care not to crush them.
- Press Mixture: Transfer the coated cereal mixture to the prepared pan. Use a spatula or lightly greased hands to press it down firmly and evenly.
- Melt Chocolate Topping: In a microwave-safe bowl, combine 1 1/2 cups semi-sweet chocolate chips with 1/4 cup creamy peanut butter. Heat in 20-second bursts, stirring between each, until fully melted and smooth.
- Spread Chocolate: Evenly spread the melted chocolate peanut butter topping over the cereal base in the pan.
- Chill and Set: Refrigerate the bars for at least 1 hour or until the chocolate topping has fully set.
- Slice and Serve: Use the parchment paper to lift the bars out of the pan. Slice into squares and enjoy.
Notes
- Use parchment paper with some overhang for easy removal and clean slicing without sticking.
- Press the cereal mixture firmly but gently to maintain crunchiness without crushing the flakes too much.
- Microwave the chocolate mixture in short intervals to prevent burning and ensure smooth melting.
- Store leftover bars in an airtight container in the refrigerator to keep them fresh and firm.
- You can substitute peanut butter with almond or cashew butter if preferred.


