

Imagine sinking your fork into fluffy layers of rich chocolate cake, sweet-tart cherries, and silky whipped cream – that’s the magic of this Black Forest Chocolate Cake Recipe. It’s a classic dessert that feels luxurious yet homemade, perfect for special occasions or just because.

Why You’ll Love This Recipe
- Classic Flavor Combination: Chocolate, cherries, and cream come together in a timeless way that everyone loves.
- Light and Airy Texture: The genoise cake layers are fluffy but sturdy enough to hold the luscious fillings perfectly.
- Easy to Customize: You can tweak the cherries or chocolate types for your preferred sweetness and richness.
Ingredients You’ll Need
Each ingredient plays a special role here — the eggs build the airy cake, cherries add brightness, and the whipped cream ties everything together with indulgent silkiness. Picking good-quality chocolate and fresh cherries will elevate the whole cake.

- Eggs: Room temperature eggs whisk up best for fluffy cake layers.
- Granulated sugar: Provides the right sweetness and helps with the airy texture.
- All-purpose flour: Use fresh flour for the best rise and texture.
- Cocoa powder: Unsweetened and good quality brings deep chocolate flavor.
- Salt: Enhances all the flavors without making it salty.
- Baking powder: Just a touch to give the cake some extra lift.
- Canned or jarred cherries in syrup: I love a mix of dark sweet cherries and maraschino cherries for color and contrast.
- Heavy whipping cream: Chilled cream whips up beautifully into Chantilly cream.
- Vanilla extract: Adds warmth and depth to the whipped cream.
- Semi-sweet chocolate: For a smooth, rich ganache coating.
Variations
I like to experiment by switching up the cherry component or adjusting the types of chocolate based on mood and occasion. Feel free to make this recipe your own – it’s super forgiving!
- Fresh Cherries: I switched to fresh cherries once and simmered them with a bit of sugar to make a quick syrup – it added a bright, natural flavor.
- Chocolate Variety: Using half dark and half milk chocolate in the ganache gives a milder, creamier finish that my family really enjoyed.
- Dairy-Free Version: I’ve tried coconut cream whipped as a substitute for Chantilly cream, and it worked surprisingly well.
How to Make Black Forest Chocolate Cake Recipe

Step 1: Whisk Eggs and Sugar for the Perfect Base
This is the heart of the genoise cake. You’ll whisk the eggs and sugar for 5-7 minutes until they’re pale, thick, and tripled in volume. Trust me, this takes patience but it’s worth every second—don’t rush it or your cake won’t be as springy and light.
Step 2: Gently Fold in Dry Ingredients
Sift together your cocoa, flour, baking powder, and salt. Then, fold them carefully into your egg mixture with a rubber spatula. The key is gentle, slow folding so you don’t deflate that beautiful air you just whisked in. Stop once just combined — no flour streaks!
Step 3: Bake Your Cake Layers
Pour the batter evenly into prepared pans (I use four 8-inch rounds). Bake at 350°F for about 10-12 minutes. Keep an eye on them — you want a clean toothpick but don’t overbake or the cake will dry out. Cooling in the pans for 20 minutes helps maintain shape, then let them cool fully on a wire rack.
Step 4: Prep Your Cherries and Syrup
Drain your cherries but save the syrup. Pour the syrup into a saucepan to reduce slightly — this concentrates the flavor and makes the perfect soak for your cake layers. Chop most of the cherries but keep some whole for decorating later.
Step 5: Whip Chantilly Cream
Whisk the cold heavy cream with sugar, salt, and vanilla until medium peaks form. You’re looking for cream that holds shape but isn’t stiff or grainy. This is what makes the cake so dreamy and light.
Step 6: Make the Ganache
Heat the cream and pour over chopped chocolate. Microwave in short bursts, stirring often, until smooth. Let it cool to room temperature before drizzling, so it sets just right on your cake.
Step 7: Assemble and Decorate
Layer your cakes upside down, brushing each layer generously with cherry syrup. Spread whipped cream, scatter chopped cherries, and drizzle ganache. Repeat until you finish with a frosting layer of cream, then chill to set. For that elegant drip look, warm the ganache and pour it evenly over the top, letting it fall down the sides.
Pro Tips for Making Black Forest Chocolate Cake Recipe
- Trust the Whisking: Whisk your eggs and sugar until tripled in volume—this is what makes the genoise so fluffy without added butter.
- Fold Gently: Less stirring means more air left in the batter; it really impacts the lightness of your cake.
- Use a Turntable: It makes layering and frosting so much easier and more precise.
- Don’t Overbake: Keep your bake time tight — even a minute too long dries this delicate cake.
How to Serve Black Forest Chocolate Cake Recipe

Garnishes
I love piping little whipped cream rosettes around the edges and topping each with a shiny cherry. A sprinkle of fresh chocolate shavings or grated chocolate adds an elegant finishing touch and some texture.
Side Dishes
This cake is rich enough on its own, but I’ve paired it with simple vanilla ice cream or a fresh berry compote for extra brightness and contrast. A cup of strong coffee or a black tea is the perfect pairing to balance sweetness.
Creative Ways to Present
For birthdays or celebrations, I like to add edible gold leaf accents or fresh mint leaves to brighten the look. You can also serve individual slices with extra cherries and a drizzle of ganache on the plate for an elegant touch.
Make Ahead and Storage
Storing Leftovers
I store leftover cake in an airtight container in the fridge, where it keeps beautifully for up to four days. Just make sure to keep it chilled so the whipped cream and ganache stay fresh and luscious.
Freezing
I’ve frozen slices wrapped tightly in plastic wrap and foil. When thawed overnight in the fridge, they maintain the flavor but the texture of the whipped cream is a bit softer. I generally recommend freezing only if necessary.
Reheating
This cake is best enjoyed chilled, but if the ganache firms up too much, leaving slices at room temperature for 20 minutes before serving softens it nicely. Avoid microwaving to keep the texture intact.
FAQs
-
Can I use fresh cherries instead of canned for the Black Forest Chocolate Cake Recipe?
Absolutely! Fresh cherries add a lovely natural brightness. Just pit them and simmer with sugar and water to create a syrupy soak and softened fruit for inside the cake. This makes the cake taste fresh and vibrant, just like the traditional canned cherry syrup.
-
What’s the key to making a moist Black Forest Chocolate Cake?
Brushing the cake layers generously with cherry syrup is what keeps this cake moist and flavorful. Also, baking the genoise just until a toothpick comes out clean ensures it doesn’t dry out, so timing is really important here.
-
Can I make this cake ahead of time?
Yes, but it’s best to assemble and serve within a day for the freshest texture. You can bake the sponge layers a day ahead and wrap them tightly to keep moisture, then assemble the next day. Once frosted, store in the fridge and serve within 3-4 days.
-
How do I get the ganache drip effect?
Warm the ganache until it’s runny but not hot, then pour it over the chilled cake, letting it drip naturally down the sides. Using an offset spatula helps spread it evenly, and doing this right before serving gives it that gorgeous glossy finish.
Final Thoughts
This Black Forest Chocolate Cake Recipe is close to my heart because it perfectly balances elegance with comfort. It’s one of those desserts where each bite feels special—rich yet light, indulgent yet fresh. I hope you enjoy making it as much as I do, and that it becomes a beloved recipe in your kitchen for celebrations or everyday treats alike!
Print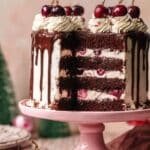
Black Forest Chocolate Cake Recipe
- Prep Time: 25 minutes
- Cook Time: 15 minutes
- Total Time: 1 hour 40 minutes
- Yield: 12 servings 1x
- Category: Dessert
- Method: Baking
- Cuisine: European
Description
This Perfect Chocolatey Black Forest Cake combines a light and fluffy chocolate Genoise sponge with luscious cherries soaked in syrup, rich Chantilly whipped cream, and silky chocolate ganache. Ideal for special occasions, this stunning cake layers moist textures and flavors for a decadent dessert experience.
Ingredients
Chocolate Genoise Cake
- 8 large eggs, room temperature
- 1 cup granulated sugar
- 1 cup all purpose flour (130 g)
- ½ cup cocoa powder (50 g)
- ½ tsp salt
- 2 tsp baking powder
Cherries and Syrup
- 2 cans (14 oz each) pitted cherries in syrup
- Handful of maraschino or dark sweet cherries for decoration
Chantilly Whipped Cream
- 3 cups heavy whipping cream, chilled (720 g)
- ¼ cup granulated sugar (50 g)
- 1 tsp vanilla extract
- ⅛ tsp salt
Ganache
- 240 g semi sweet chocolate (or mix of dark and milk chocolate)
- 1 cup heavy cream (240 g)
Instructions
- Prepare and bake the cake: Preheat your oven to 350°F. Line four 8-inch round cake pans with parchment paper without greasing the sides. Using a stand mixer fitted with a whisk attachment, beat the eggs and sugar on medium-high speed for 7 minutes until pale, thick, and tripled in volume.
- Fold dry ingredients: Sift together the flour, cocoa powder, baking powder, and salt. Gently fold them into the egg mixture with a rubber spatula, being careful not to deflate the batter. Stop folding once no flour streaks remain and the mixture is fluffy.
- Bake: Evenly divide the batter among the pans and smooth the tops. Bake for 12 minutes or until a toothpick inserted in the center comes out clean. Let the cakes cool in pans for 20 minutes, then transfer to wire racks to cool completely.
- Prepare cherries and syrup: Drain the cherries, reserving the syrup in a saucepan. Chop all but a few decorative cherries. Gently simmer the syrup 3–5 minutes to reduce slightly and cool completely.
- Make Chantilly cream: Whisk the cold heavy cream with sugar, salt, and vanilla on medium-high speed until medium peaks form—firm enough to hold shape but still soft and smooth.
- Make ganache: Combine chocolate and heavy cream in a microwave-safe bowl. Heat in 20-second increments, stirring between each, until smooth. Let cool at room temperature for 15 minutes.
- Assemble cake: Place one cake layer upside down and brush generously with cherry syrup. Spread a thick layer of whipped cream, then scatter a third of the chopped cherries and press gently. Drizzle 2–3 tablespoons of ganache on top. Repeat layering two more times, finishing with the last cake layer brushed with syrup and frosted with remaining whipped cream. Chill for 15 minutes.
- Decorate with ganache drip and piping: Warm ganache until pourable but not hot. Pour on top letting it drip down the sides. Optionally pipe remaining whipped cream around edges and top each dollop with a reserved cherry. Sprinkle chocolate shavings to finish.
- Serve and enjoy: Keep refrigerated until serving. Serve chilled for best flavor and texture.
Notes
- For fresh cherries: Remove pits from 2 cups fresh cherries, cook with 4 tablespoons water and 4 tablespoons sugar on medium-low heat for 10 minutes to create syrup. Use syrup for soaking and chop cherries for filling.
- Make ahead: Freshly decorated is best. Cake can be made up to 1 day ahead, stored airtight in fridge up to 4 days to prevent drying.
- Use four 8-inch pans for even layers, but three pans can work if needed.
- Be gentle folding to maintain airy texture in Genoise batter.
- Ensure whipping cream is cold for optimal Chantilly cream consistency.


