

Japanese Chicken Katsu Curry Recipe is one of those soul-satisfying meals that just hits the spot every single time. The crispy golden chicken paired with the rich, savory curry sauce over fluffy rice is an absolute winner in my kitchen – once you try this, you’ll see why it’s such a beloved classic.

Why You’ll Love This Recipe
- Crunchy, tender chicken: The panko and parmesan crust gives the katsu an irresistible crispy texture.
- Rich homemade curry sauce: It’s thick, flavorful, and comforting without being overwhelming.
- Meal prep friendly: You can make the curry ahead and fry the chicken fresh for a quick dinner.
- Perfect balance: Sweet, savory, and just a hint of spice makes this dish super satisfying.
Ingredients You’ll Need
Every ingredient here plays a role in building that authentic, deep flavor and that perfect crunchy bite. When shopping, try to find Japanese curry roux for the most classic taste, or make your own if you’re feeling adventurous.

- Boneless chicken thigh or breast: Thighs are juicier, breasts are leaner – both work beautifully here.
- Salt and pepper: Simple seasoning to bring out the chicken’s natural flavor.
- Butter: Adds richness when cooking the curry base.
- Onion: Sliced thin for sweetness that balances the spice.
- Potato and carrot: Classic curry vegetables that soak up all that delicious sauce.
- Japanese curry roux: The star seasoning that makes this curry uniquely comforting.
- Water: Check your curry roux package for the perfect amount to ensure the right thickness.
- Tsuyu sauce: Adds umami depth to the curry (you can find it in most Asian markets).
- Honey: Just a touch to balance the savory with a hint of sweetness.
- Sake: Adds aroma and a subtle complexity.
- Chili powder (optional): Gives a slight heat kick if you like it spicy.
- Fenugreek powder: Adds a warm, slightly nutty aroma unique to Japanese curry blends.
- Tomato ketchup: A secret ingredient for tang and balance.
- Cooking oil for frying: Use a neutral oil with a high smoke point like vegetable or canola oil.
- All-purpose flour: For dredging and battering the chicken.
- Water, eggs: Together with flour to form the batter for the chicken.
- Panko breadcrumbs: This coating ensures the katsu comes out ultra-crispy.
- Grated Parmesan cheese: Mixed into panko to add a subtle savory boost.
- Cooked Japanese short-grain rice: Essential for soaking up the luscious curry sauce.
- Fukujinzuke pickles and fresh parsley (optional): Pickles add a crunchy sweet tang and parsley freshness to finish.
Variations
I like to play around with this Japanese Chicken Katsu Curry Recipe depending on my mood or what’s in the fridge. Feel free to personalize it—you’ll discover your favorites fast!
- Using chicken thighs instead of breasts: I found thighs stay juicier and more forgiving if you’re new to frying katsu.
- Vegetarian option: Swap the chicken for thick slices of fried tofu or eggplant for an equally tasty experience.
- Adjusting spice level: Add more chili powder or a dash of cayenne if you want that curry with a kick.
- Make it gluten free: Try gluten-free flour and panko alternatives to keep the crunch for sensitive diets.
- Seasonal veggies: Sometimes I toss in mushrooms or peas to bring in fresh, earthy notes.
How to Make Japanese Chicken Katsu Curry Recipe

Step 1: Preparing the Curry Base
Start by cutting the chicken into bite-sized pieces and seasoning lightly with salt and pepper. Then, slice the onion thinly and chop the potatoes and carrots into chunks. These veggie sizes help them cook evenly without turning mushy. Melt butter in a pot over medium heat and brown the chicken pieces just until sealed—that locks in those juicy juices. Once the chicken has a bit of color, add the onions and cook until softened. Then, stir in potatoes, carrots, and a splash of tsuyu sauce for umami magic. Pour in water (the amount depends on your curry roux instructions), bring it to a boil, then lower the heat.
Step 2: Building Deep Curry Flavors
Once the pot simmers, add in the Japanese curry roux cubes or homemade roux, stirring to dissolve fully. This part always smells heavenly—the blend of spices thickens the sauce beautifully. Now toss in honey, sake, fenugreek powder, tomato ketchup, and chili powder (if using). Let everything simmer gently for 10 to 20 minutes until the sauce thickens and the flavors meld perfectly. I like to keep it covered and stir occasionally so it doesn’t stick or get too thick.
Step 3: Making the Crispy Chicken Katsu
While the curry simmers, it’s time for the star: the katsu. Heat oil to about 170°C (338°F) in a deep pan or fryer. Meanwhile, slice chicken breasts horizontally to create thinner cutlets about 1 cm thick—that helps them cook evenly. Season both sides with salt and pepper, then gently pound the chicken with a meat mallet or rolling pin for even thickness. In a bowl, whisk eggs, flour, and water into a thick batter. On a plate, mix panko breadcrumbs with grated parmesan cheese—this combo adds an incredible flavor boost and crunch. Coat each piece of chicken in flour first, shake off excess, then dip into the batter. Finally, press the chicken into the breadcrumb mixture until it’s fully coated. Carefully slide the chicken into the hot oil and fry for about 6 minutes, flipping halfway to get an even golden crust. Drain on a wire rack so the chicken stays crispy and not soggy.
Step 4: Serving Up Your Feast
Plate your cooked rice on one side, ladle the luscious curry alongside, and arrange sliced katsu in the middle. Don’t skip the fukujinzuke pickles if you have them—they add that bright crunch and sweet tang that cuts through the richness. Sprinkle fresh parsley on top for a pop of color and freshness. I love how this combo balances flavors and textures in every bite!
Pro Tips for Making Japanese Chicken Katsu Curry Recipe
- Don’t skip the parmesan in the panko: It adds subtle depth and really amps up the crispiness and flavor of the coating.
- Pound the chicken evenly: This not only makes frying faster but guarantees tender, juicy katsu every time.
- Keep an eye on the curry thickness: If it gets too thick, add a splash of water, but remember curry thickens as it cools too.
- Use a wire rack after frying: It prevents the katsu from getting soggy from excess oil compared to paper towels.
How to Serve Japanese Chicken Katsu Curry Recipe

Garnishes
I’m a big fan of topping this dish with fukujinzuke pickles because their sweet and tangy crunch cuts through the richness perfectly. Sometimes, I sprinkle fresh parsley or even chopped scallions for a little fresh bite and color to brighten up the plate.
Side Dishes
This recipe stands beautifully on its own, but on occasion, I’ll add a simple cucumber salad or steamed greens like broccoli or spinach to add some lightness and freshness alongside the hefty, warming curry.
Creative Ways to Present
For special occasions, I like to serve the chicken katsu sliced into smaller strips arranged neatly over the rice in a fan shape, then drizzle a little extra curry sauce around the plate for a restaurant-style vibe. A small bowl of pickled ginger on the side adds a burst of color and a palate-cleansing zing.
Make Ahead and Storage
Storing Leftovers
I’ve found that storing the curry sauce and chicken separately in airtight containers keeps everything tasting fresh. The curry actually tastes better the next day as the flavors deepen, so pack leftovers for lunch or a quick dinner.
Freezing
This Japanese Chicken Katsu Curry Recipe freezes well—just freeze the curry sauce by itself. The chicken is best fried fresh, but you can freeze cooked katsu if you’re in a pinch and reheat it crisp in the oven.
Reheating
For the curry, simply reheat gently in a saucepan adding a splash of water if it’s thickened too much. For the katsu, I pop it in a preheated oven or air fryer for a few minutes to restore that golden crunch—microwaving tends to make it soggy, so try to avoid that if you can.
FAQs
-
Can I use chicken breast instead of thigh?
Absolutely! Chicken breasts work wonderfully in this recipe. I recommend pounding them to an even thickness so they cook evenly and stay tender. Thighs are juicier, but both are tasty.
-
What if I can’t find Japanese curry roux?
You can make your own curry roux at home or use a mild store-bought curry powder blend as a substitute. Just keep in mind the flavor and thickness might differ slightly, but the dish will still be delicious.
-
How do I keep the katsu crispy after frying?
Drain the fried chicken on a wire rack instead of paper towels to avoid sogginess. Also, serve it soon after frying or reheat in the oven to revive the crisp texture.
-
Can I make this recipe ahead for meal prep?
Yes! The curry sauce can be made ahead and stored in the fridge for several days. Fry the katsu fresh when ready to eat for best texture, or fry in advance and reheat carefully.
Final Thoughts
This Japanese Chicken Katsu Curry Recipe has become such a comforting staple in my home — it’s just so satisfying, flavorful, and versatile. I promise once you get the hang of the katsu crispiness and the curry simmering, you’ll be making it again and again. Trust me, your family and friends will go crazy for it, and you’ll love how simple it is to make a restaurant-worthy meal right in your own kitchen.
Print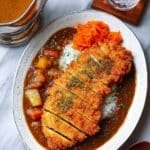
Japanese Chicken Katsu Curry Recipe
- Prep Time: 20 minutes
- Cook Time: 40 minutes
- Total Time: 1 hour
- Yield: 4 portions 1x
- Category: Main Course
- Method: Frying
- Cuisine: Japanese
- Diet: Halal
Description
Japanese chicken katsu curry is a comforting dish featuring tender chicken breast coated in a crispy panko Parmesan batter, served over a rich and thick Japanese-style curry with vegetables. Perfect for making ahead and enjoying as a hearty lunch or dinner.
Ingredients
Japanese Style Curry
- 300 g boneless chicken thigh or chicken breast
- 1 pinch salt and pepper
- 1 tbsp butter
- 1 onion, thinly sliced
- 2 potatoes, peeled and cut into bite-size pieces
- 1 carrot, peeled and cut into bite-size pieces
- 4 servings Japanese curry roux (homemade or boxed)
- 600 ml water
- 1 tbsp tsuyu sauce (noodle soup base)
- ½ tbsp honey
- 1 tbsp sake
- 1 pinch chili powder (optional)
- ½ tsp fenugreek powder
- 1 tsp tomato ketchup
Chicken Katsu
- cooking oil for deep frying
- 2 chicken breasts
- 2 pinches salt and pepper
- 6 tbsp all-purpose flour (for coating)
- 100 ml water
- 2 eggs
- 100 g all-purpose flour (for batter)
- 50 g panko breadcrumbs
- 4 tbsp grated Parmesan cheese
To Serve
- 4 portions cooked Japanese short-grain rice
- Fukujinzuke pickles (optional)
- Fresh parsley (optional)
Instructions
- Prepare Curry Ingredients: Cut the chicken into bite-size pieces and season with salt and pepper. Thinly slice the onion. Peel and cut potatoes and carrots into bite-size chunks.
- Cook Curry Base: Heat a large pot over medium heat and melt the butter. Add the chicken pieces and fry until the outside is sealed. Add the sliced onion and cook until softened.
- Add Vegetables and Seasoning: Add potatoes, carrots, and tsuyu sauce to the pot. Stir over heat for about 1 minute to combine flavors.
- Add Water and Simmer: Pour in 600 ml water and bring to a boil. Lower the heat to simmer and add the curry roux, stirring until fully dissolved.
- Finish Curry Flavor: Stir in honey, sake, fenugreek powder, tomato ketchup, and chili powder (if using). Simmer the curry for 20 minutes or until thickened to your liking. Keep warm with lid on.
- Prep Chicken for Katsu: While curry simmers, heat cooking oil to 170°C (338°F). Cut chicken breasts in half horizontally, season with salt and pepper. Wrap in plastic and pound until 1 cm thick.
- Make Batter and Coating: In a bowl, whisk together water, eggs, and 100 g flour to form a thick batter. Mix panko breadcrumbs and Parmesan cheese on a plate. Spread 6 tbsp flour on another plate for dredging.
- Coat Chicken: Dredge chicken pieces in flour, shaking off excess. Dip into batter, then coat thoroughly with the panko-Parmesan mixture.
- Fry Katsu: Carefully place coated chicken into hot oil. Fry for 6 minutes, turning halfway until golden and cooked through. Drain on a wire rack to remove excess oil.
- Serve: Plate cooked rice, spoon curry alongside, and arrange sliced katsu strips on top. Garnish with fukujinzuke pickles and fresh parsley, if desired. Enjoy hot.
Notes
- Use chicken thigh for juicier katsu or chicken breast for leaner meat.
- Adjust chili powder amount or omit based on spice preference.
- Ensure oil temperature stays around 170°C for crispy, non-greasy katsu.
- Store leftover curry and katsu separately and reheat gently to preserve texture.
- Substitute sake with dry white wine or omit if preferred.
- Fukujinzuke pickles add authentic flavor but can be skipped or replaced with pickled vegetables.


