

That irresistible caramelized spice flavor in every bite makes this **Biscoff Cheesecake Recipe** a real game changer in the dessert world. The rich, creamy filling paired with the crunchy cookie crust brings a beautiful texture combo that’s just so comforting and satisfying. I love how it’s both simple and fancy enough for any occasion.

Why You’ll Love This Recipe
- Simplicity: Minimal ingredients come together quickly without complicated steps.
- Flavor-packed: The signature Biscoff taste shines in every creamy, velvety spoonful.
- Make-ahead friendly: It needs chilling time, but that just means you can prep in advance.
- Versatility: Perfect for casual gatherings or impressing guests with minimal fuss.
Ingredients You’ll Need
The ingredients all work beautifully to layer in that classic Biscoff flavor throughout the crust, filling, and topping—so no bite is left behind. Picking good-quality Biscoff cookies and spread really elevates the taste here.

- Biscoff cookies: Using crushed Biscoff cookies for the crust gives that perfectly crunchy, spiced base.
- Butter: Melted butter binds the cookie crust—unsalted varieties help control the saltiness.
- Cream cheese: Softened for smooth mixing; this makes the cheesecake luxuriously creamy.
- Superfine sugar: It dissolves better, ensuring a silky filling without graininess.
- Biscoff spread: Adds the star flavor and pairs perfectly with the cookies’ crunch.
- Heavy cream: Beaten in to lighten and stabilize the luscious filling.
- Additional Biscoff spread & cookies (for frosting): For that glossy, extra-flavorful finishing touch.
Variations
I’ve had fun tweaking this Biscoff Cheesecake Recipe to suit different moods or dietary needs—you should too! It’s pretty forgiving, so feel free to play with flavors or textures.
- Dairy-free version: I swapped in vegan cream cheese, butter, and cream before—works great and still delivers that creamy texture.
- Nutty twist: Adding a sprinkle of chopped toasted pecans or hazelnuts on top adds a welcome crunch.
- Spice it up: Mixing a pinch of cinnamon or nutmeg into the crust complements the Biscoff spices beautifully.
- Mini cheesecakes: Tried this in muffin tins for single-serve bites—perfect for parties or portion control.
How to Make Biscoff Cheesecake Recipe

Step 1: Prepare the Crust
Start by lining an 8-inch springform pan with parchment paper—this saves so much stress when it’s time to release the cheesecake. Then, crush your Biscoff cookies finely, either in a food processor or by popping them in a bag and giving them a good smash with a rolling pin. Mix the crushed cookies with melted butter until everything looks like damp sand. Press this mixture evenly into the bottom of your pan. I usually press down firmly using the back of a spoon or a small glass to make a compact crust that holds together nicely. Pop it into the fridge to chill while you make the filling.
Step 2: Whip Up the Creamy Filling
In a large bowl or your mixer, beat the softened cream cheese with superfine sugar until it’s super smooth and fluffy—you really want no lumps here. Then add the Biscoff spread and continue beating until fully combined. Finally, pour in the heavy cream and beat it until the mixture thickens and holds soft peaks—usually about 2 minutes. This step gives your cheesecake that light but creamy texture you’ll love.
Step 3: Chill and Set
Use a rubber spatula to spread that luscious filling evenly over your chilled crust. Tap the pan gently on the counter to smooth out any air bubbles. Then cover it up and refrigerate overnight or at least 6 hours. I’ve learned that this waiting time is crucial—trust me, the flavors meld and the texture firms up perfectly.
Step 4: Add the Final Touch
When the cheesecake is set, gently melt some Biscoff spread (a quick zap in the microwave works well) and pour it over the top, making sure to cover the edges. Sprinkle crushed Biscoff cookies around the sides for an extra pretty finish and extra crunch. Let it chill again for about 30 minutes so the topping firms up—then you’re all set to slice and serve.
Pro Tips for Making Biscoff Cheesecake Recipe
- Room Temperature Ingredients: Letting your cream cheese and heavy cream sit out before mixing helps achieve a silky-smooth filling without lumps.
- Avoid Overbeating: Beat until just thickened—overwhipping cream can turn it grainy or even into butter.
- Press the Crust Well: Firmly pressing your cookie crust prevents crumbling when serving.
- Slow Chilling is Key: Resist the temptation to speed up chilling; slow refrigeration helps the flavors strengthen and texture perfect.
How to Serve Biscoff Cheesecake Recipe

Garnishes
I usually keep garnishes simple—extra crushed Biscoff cookies add a delightful crunch, and a drizzle of warm Biscoff spread on top amps up the caramelized goodness. Sometimes, I sprinkle a little flaky sea salt for contrast, which surprisingly works wonderfully with the sweetness.
Side Dishes
Pairing this cheesecake with a cup of strong coffee or a lightly brewed chai really complements the warm Biscoff spices. For a touch of freshness, I like to serve small bowls of fresh berries on the side—bright and tart, they’re a lovely counterpoint.
Creative Ways to Present
For holiday dinners or special celebrations, I’ve layered this cheesecake into a clear trifle dish with whipped cream and cookie crumbs in between for a show-stopping parfait. Also, mini individual cheesecakes in pretty ramekins topped with a dollop of whipped cream make charming gifts or party treats.
Make Ahead and Storage
Storing Leftovers
I always keep leftover Biscoff cheesecake refrigerated in an airtight container or wrapped tightly with plastic wrap. This helps it stay fresh and keeps that creamy texture intact for up to two weeks—longer than most cheesecakes I make!
Freezing
Freezing works surprisingly well here. Just place the cheesecake in a shallow airtight container and freeze for up to six months. When I freeze it, I usually slice before freezing so I can pull out individual portions. Just remember to thaw it overnight in the fridge before enjoying.
Reheating
This cheesecake tastes best chilled, but if you want to bring it to room temperature, just take it out of the fridge 20–30 minutes before serving. I avoid microwaving because it can affect the creamy texture, but a gentle warm-up in a low-temp oven wrapped loosely in foil can help if you prefer it softer.
FAQs
-
Can I use regular sugar instead of superfine sugar in the Biscoff Cheesecake Recipe?
Yes, regular granulated sugar can be used, but superfine sugar dissolves more easily, ensuring a smooth filling without graininess. If you only have regular sugar, you might consider pulsing it briefly in a blender to make it finer.
-
Do I have to bake this Biscoff Cheesecake Recipe?
Nope! This recipe is a no-bake cheesecake, making it much quicker and easier while still delivering that creamy, rich texture. The refrigerator does all the work to set the filling.
-
How can I prevent cracks on the cheesecake surface?
Since this is a no-bake cheesecake, cracks are less common, but to avoid any cracking of the topping, pour the melted Biscoff spread gently and make sure the cheesecake has fully chilled and set before adding it.
-
Can I make this cheesecake vegan?
Yes! Swap the cream cheese, butter, and heavy cream for plant-based versions. I’ve done it myself, and with quality vegan ingredients, the texture and flavor stay delicious.
-
Is Biscoff spread the same as cookie butter?
Essentially, yes—Biscoff spread is a type of cookie butter made from crushed Biscoff cookies, giving it that distinct caramelized flavor. Using the branded Biscoff spread ensures authentic taste.
Final Thoughts
This Biscoff Cheesecake Recipe is one I keep coming back to—it’s comforting, indulgent, and easy enough for busy days or last-minute guests. It feels like a hug in dessert form every time I slice into it. I hope you enjoy making and sharing it as much as I do—it really is a treat worth keeping in your recipe arsenal.
Print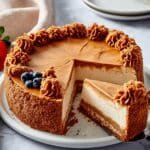
Biscoff Cheesecake Recipe
- Prep Time: 10 minutes
- Cook Time: 2 hours 10 minutes
- Total Time: 2 hours 20 minutes
- Yield: 12 servings 1x
- Category: Dessert
- Method: No-Cook
- Cuisine: American
- Diet: Vegetarian
Description
This Biscoff Cheesecake combines a crunchy Biscoff cookie crust with a creamy Biscoff spread and cream cheese filling. Topped with a smooth Biscoff frosting and crushed cookies, it’s a decadent no-bake dessert that requires chilling to set.
Ingredients
For the crust:
- 9 ounces Biscoff cookies crushed
- 6 tablespoons butter
For the filling:
- 2 1/2 cups cream cheese softened
- 1/4 cup superfine sugar
- 1 cup Biscoff spread smooth
- 1 1/4 cups heavy cream
For the frosting:
- 1/2 cup Biscoff spread melted
- 1/4 cup Biscoff cookies crushed
Instructions
- Prepare the pan: Line an 8-inch springform cake pan with parchment paper and set aside to ensure easy release of the cheesecake after chilling.
- Make the crust: In a mixing bowl, combine the crushed Biscoff cookies with melted butter until well mixed. Press the mixture firmly into the bottom of the prepared pan. Refrigerate while preparing the filling to allow the crust to set.
- Prepare the filling: In a large mixing bowl or stand mixer fitted with a paddle attachment, beat the softened cream cheese and superfine sugar until smooth and fluffy, about two minutes. Add the Biscoff spread and mix until fully incorporated. Gradually add the heavy cream and beat until the mixture thickens and stabilizes, about two more minutes.
- Assemble the cheesecake: Using a rubber spatula, spread the filling evenly over the chilled crust. Cover and refrigerate overnight or for at least 6 hours to allow it to firm up.
- Add the frosting: Once the cheesecake is firm, melt the Biscoff spread and pour it over the top, spreading it with a rubber spatula to cover all edges. Sprinkle the sides with extra crushed Biscoff cookies. Refrigerate again for 30 minutes to set the frosting.
Notes
- For a dairy-free version, substitute vegan butter, vegan cream cheese, and plant-based double cream.
- Always store the Biscoff cheesecake covered in the refrigerator; it will keep well for up to 2 weeks.
- To freeze, place the cheesecake in a shallow airtight container and freeze for up to 6 months. Thaw in the refrigerator before serving.


